Core stability is vital for sports, activities of daily living, functional independence as we age and, you guessed it, scuba diving. So what do fitness gurus and your friends at the gym mean when they refer to the core? They are talking about the musculature that surrounds the stomach: the abdominals, obliques and lower back.
Core strength has a host of benefits. A stronger midsection allows you to approach the physical challenges of scuba diving and other weight-bearing activities with more force. It enables the body to better withstand the jarring external forces that are common on a rocking boat. A strong core means increased stability for balance and transitional movements such as maneuvering on land in scuba gear. Finally, and perhaps most important, a strong core reduces risk of injury. Many people work out their arms and legs, but a weak link in the center of your body increases the likelihood that an injury will take place there. A weak or inactive core is a common cause of lower-back pain.
Out of the water, core stability is important for gear setup and transport, moving around on a rocking boat and simply standing from a seated position to embark on a journey through the deep. A strong midsection allows your body to safely and effectively oppose these external forces without suffering debilitating effects.
In the underwater realm, your core takes on a whole new level of importance. The core muscles serve as the foundation upon which movement occurs. The abs stabilize the pelvis to allow us divers to propel ourselves through the water. Strong abdominals are essential to efficient finning. Weak abdominals lead to lower-back pain.
Now we’ll dive into some of the best core exercises specifically for underwater adventurers. Most people, when thinking of core exercises, go right to sit-ups. But there are many ways to strengthen your core without doing a single sit-up.
Chair Pose
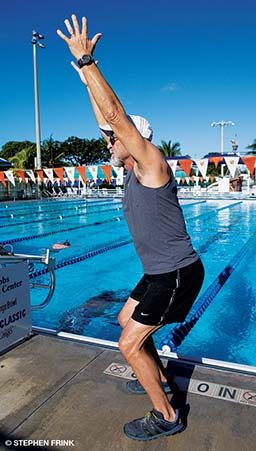
- Start standing with your feet shoulder width apart and parallel.
- Once your feet are positioned, stop looking at them, and stand with good posture.
- Sit back, shifting your weight onto your heels while raising your arms.
- Focus your eyes forward or slightly downward.
- Raise your arms, reaching your fingers toward the sky.
- Draw in your belly button, continuing to breathe while holding it. (This is one of the most important aspects of the movement.)
- Begin holding for 5 seconds, and work up to 30 seconds.
- Repeat five times.
Tips:
- Relax your neck.
- Keep your chest up and your eyes down.
- Keep breathing.
Challenge: Try to slide your feet closer together.
Bridges
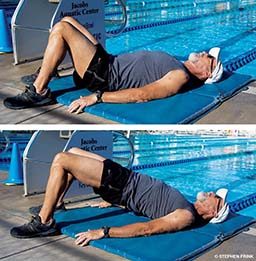
- Begin by laying on your back with your knees bent and your fleet flat on the floor.
- Flatten your lower back to the floor.
- While maintaining this position, lift your hips until your body is in a straight line from your knees to your shoulder blades.
- Begin holding for 5 seconds, and work up to 30 seconds.
- Repeat 10 times.
Tip: Squeeze your glutes (butt muscles), and continue to breathe.
Challenge: Try to squeeze a pillow between your knees while you hold the bridge position (the natural tendency is for your knees to splay outward).
Single Leg Standing
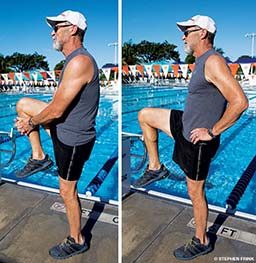
- Begin with good neutral posture and your feet shoulder width apart. (It’s a good idea to start near a wall in case you lose your balance.)
- Transfer your weight onto your dominant foot.
- Slowly flex your hip and knee, picking up your nondominant foot off the ground.
- The goal is to flex your hip until your thigh is parallel to the floor, and hold your knee with your hands. Just raising your foot an inch or two from the floor, however, will activate your core. So pay attention to your body, and work where you are comfortable.
- Hold for 5-30 seconds (depending on your balance).
- Repeat on the opposite side.
- Repeat five times.
Tips:
- Keep your chest up.
- Keep your shoulders back.
- Focus on a specific, stationary spot.
- Standing on a hard surface is easier.
- If you start to lose your balance, put your foot down on the floor.
Challenge: Keep your knee up without using your hands.
Flat Back

- Begin with good neutral posture and your feet shoulder width apart.
- Fold forward at your waist, allowing your arms to dangle toward your toes, and relax.
- Bend your knees slightly, and extend through your back so that your hands hang at knee level.
- Squeeze together your shoulder blades, and contract your belly button toward your spine. Your back should be flat like a table top. Your head and neck should be in a neutral position, with your eyes focused slightly in front of you.
- Hold for 5-10 seconds while continuing to breathe.
- Release back into a forward fold.
- Repeat 10 times.
Tip: Focus on squeezing your shoulder blades and preventing your tummy from sagging.
Challenge: Increase the duration of the hold to 30 seconds.
If you follow the exercises listed above, you will be on your way to a rock-solid core — without doing a single sit-up. Enjoy your newfound strength, and continue on your journey through the water uninterrupted by injury.
NOTE: To avoid an increased risk of decompression sickness, DAN® recommends that divers avoid strenuous exercise for 24 hours after making a dive. During your annual physical exam or following any changes in your health status, consult your physician to ensure you have medical clearance to dive.